AI can significantly enhance the efficiency of development teams by automating tasks, improving testing, and providing insights for better decision-making. So if you want a better CI/CD pipeline, you should look into StackSpot AI’s remote Quick Commands.
The shorter the feedback loop when implementing new features, the better for the development team.
A rapid feedback loop allows developers to receive immediate insights into their work, enabling them to course-correct swiftly. This approach fosters the culture of continuous improvement, where lessons learned from each iteration can be applied promptly, leading to faster innovation and higher-quality outcomes.
Development teams utilize Source Code Management tools (SCM) such as GitHub, GitLab, or BitBucket for coding, collaboration, building, and deploying applications, relying on them for feedback when tasks cannot be completed locally, as these tools are closest to the source.
This article discusses how developers can get quick feedback regarding their contributions using StackSpot AI and the concept of remote Quick Command.
New possibilities for CI/CD pipeline with AI
Crafting prompts (questions or tasks) to elicit specific responses from the AI is becoming routine. By providing clear, concise prompts, you guide the AI’s understanding and encourage relevant, useful answers.
This practice is enhanced by giving context to the AI through the prompt’s history or Knowledge Sources, making the interaction more effective.
However, SCM tools don’t (yet) offer direct prompt usage natively to automate development processes. To do so, automations are executed locally and integrated with CI/CD pipeline to check or manipulate code implementations submitted by the development team.
These are a few examples of common usage of AI in CI/CD pipelines:
- Automated code reviews
- Compliance and Governance checks
- Test-case generation
- Enhancements (security, performance etc.)
The goal in the example below is to create our own automation using AI and prompt engineering, to check our code, and to perform customized operations.
Example: How to create a basic security action on GitHub Action, using StackSpot AI remote Quick Command
In this example, we will create a basic security action on GitHub Action, using StackSpot AI remote Quick Command.
Prompt configuration
To create a StackSpot AI remote Quick Command, log in to your StackSpot AI account. Then, create a remote Quick Command following the steps outlined in the documentation.
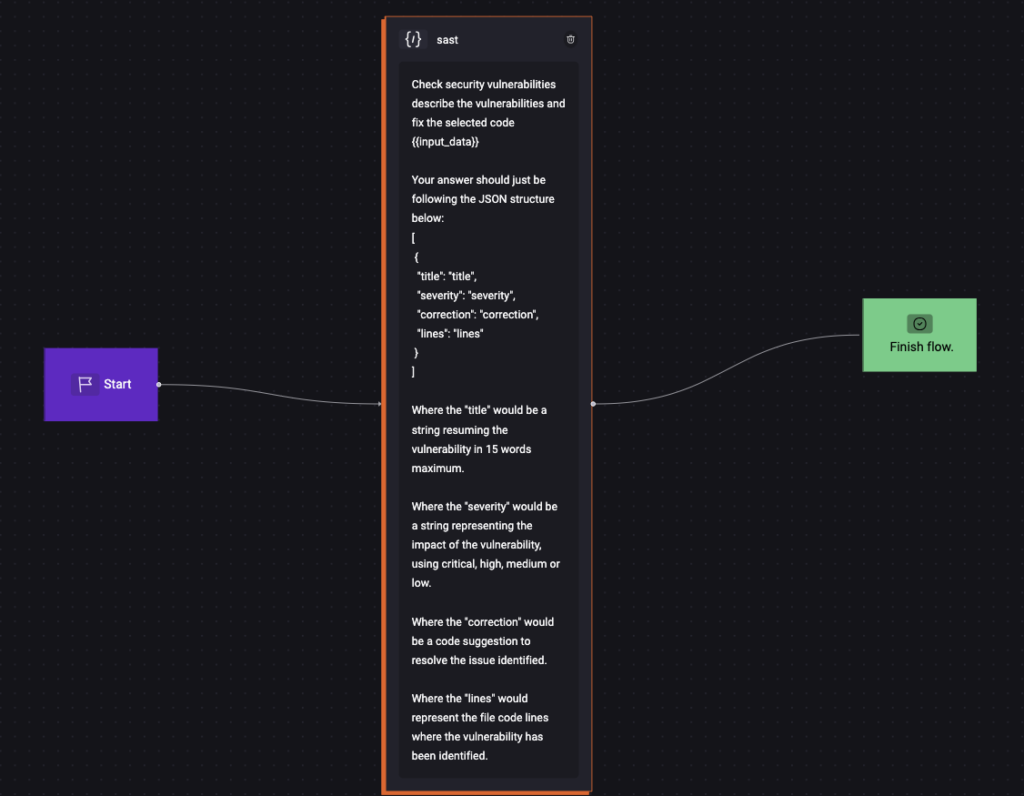
For this example, we will only need one step in our Quick Command, asking to check security vulnerabilities based on the data received.
Note: {{input_data}} is the syntax used by the platform.
Prompt:
Check security vulnerabilities describe the vulnerabilities and fix the selected code {{input_data}}

Your answer should just be following the JSON structure below:
[
```
 {
  "title": "title",
  "severity": "severity",
  "correction": "correction",
  "lines": "lines"
 }
 ```
]

Where the "title" would be a string resuming the vulnerability in 15 words maximum.

Where the "severity" would be a string representing the impact of the vulnerability, using critical, high, medium or low.

Where the "correction" would be a code suggestion to resolve the issue identified.

Where the "lines" would represent the file code lines where the vulnerability has been identified.
Importantly, the prompt requests a JSON object as output, in that case in an array (we will manipulate the data later). Moreover, it details the expected rules applied to each field in the response object.
Here is how the remote Quick Command should look like on the platform once configured:

StackSpot AI API
Once we create our remote Quick Command, we need to be able to call it on demand. This is possible through the StackSpot Code Buddy API.
1. Authentication
This step is required to generate an access_token that will be used to call the StackSpot Code Buddy API.
Here is an example of a function calling this API in Python:
def get_access_token(account_slug, client_id, client_key):
    url = f"https://idm.stackspot.com/{account_slug}/oidc/oauth/token"
    headers = {'Content-Type': 'application/x-www-form-urlencoded'}
    data = {
        'client_id': client_id,
        'grant_type': 'client_credentials',
        'client_secret': client_key
    }
    response = requests.post(url, headers=headers, data=data)
    response_data = response.json()
    return response_data['access_token']
2. Start remote Quick Command execution
This step forwards the input_data to the AI tool that will analyze it using the prompt previously configured in the Prompt configuration section.
Here is an example of a function calling this API in Python:
def create_rqc_execution(qc_slug, access_token, input_data):
    url = f"https://genai-code-buddy-api.stackspot.com/v1/quick-commands/create-execution/{qc_slug}"
    headers = {
        'Content-Type': 'application/json',
        'Authorization': f'Bearer {access_token}'
    }
    data = {
        'input_data': input_data
    }
    response = requests.post(
        url,
        headers=headers,
        json=data
    )

    if response.status_code == 200:
        decoded_content = response.content.decode('utf-8')  # Decode bytes to string
        extracted_value = decoded_content.strip('"')  # Strip the surrounding quotes
        response_data = extracted_value
        print('ExecutionID:', response_data)
        return response_data
    else:
        print(response.status_code)
        print(response.content)
3. Polling
This step checks the remote execution status until the operation has been successfully performed.
Here is an example of a function calling this API in Python using a 5s delay between requests:
def get_execution_status(execution_id, access_token):
    url = f"https://genai-code-buddy-api.stackspot.com/v1/quick-commands/callback/{execution_id}"
    headers = {'Authorization': f'Bearer {access_token}'}
    i = 0
    while True:
        response = requests.get(
            url,
            headers=headers
        )
        response_data = response.json()
        status = response_data['progress']['status']
        if status in ['COMPLETED', 'FAILED']:
            return response_data
        else:
            print("Status:", f'{status} ({i})')
            print("Execution in progress, waiting...")
            i+=1
            time.sleep(5)  # Wait for 5 seconds before polling again
4. Sequence
Now we need to bring all the steps together to perform the entire process. Here is an example in Python using environment variables:
# Replace the placeholders with your actual data
CLIENT_ID = os.getenv("CLIENT_ID")
CLIENT_KEY = os.getenv("CLIENT_KEY")
ACCOUNT_SLUG = os.getenv("CLIENT_REALM")
QC_SLUG = os.getenv("QC_SLUG")
INPUT_DATA = os.getenv("INPUT_DATA")

# Execute the steps
access_token = get_access_token(ACCOUNT_SLUG, CLIENT_ID, CLIENT_KEY)
execution_id = create_rqc_execution(QC_SLUG, access_token, INPUT_DATA)
execution_status = get_execution_status(execution_id, access_token)

result = execution_status['result']

# Remove the leading and trailing ```json and ``` for correct JSON parsing
if result.startswith("```json"):
    result = result[7:-4].strip()

result_data = json.loads(result)
Afterward, the result_data is a JSON object which can be manipulated for any action.
GitHub Action usage
Now that we have a Python script that allows us to call a remote Quick Command, we need to put it into practice in our CI/CD pipeline. We will do so using GitHub Actions.
Composite Action
As we created a Quick Command that detects security vulnerabilities, we need to configure a GitHub Action that will be able to identify files and manipulate them during the CI process so that our feedback loop can start as soon as a pull request is opened.
To do so, we created a composite action, which has the advantage of working for all default GitHub Action runners (Ubuntu, macOS, and Windows), and allows calling other existing actions from the GitHub marketplace.
This action will use three other actions:
- actions/checkout: to access the repository files.
- tj-actions/changed-files: to identify which files have been updated.
- actions/setup-python: to configure Python in the runner.
After configuring those actions, it will extract the list of files generated by the changed-files actions and call the Python script created in the StackSpot AI API section to send them as input_data to our remote Quick Command.
Here is how this script step looks like in the action.yaml file:
 - name: Run Remote Quick Command
      env:
        CLIENT_ID: ${{ inputs.CLIENT_ID }}
        CLIENT_KEY: ${{ inputs.CLIENT_KEY }}
        CLIENT_REALM: ${{ inputs.CLIENT_REALM }}
        QC_SLUG: ${{ inputs.QC_SLUG }}
        CHANGED_FILES: ${{ steps.changed-files.outputs.all_changed_files }}
      run: python3 ${{ github.action_path }}/rqc.py
      shell: bash
The Python script also needed to be adapted to extract this CHANGED_FILES variable and perform a loop with the list returned.
Here is an example done in Python:
# Replace the placeholders with your actual data
CLIENT_ID =  os.getenv("CLIENT_ID")
CLIENT_KEY = os.getenv("CLIENT_KEY")
ACCOUNT_SLUG = os.getenv("CLIENT_REALM")
QC_SLUG = os.getenv("QC_SLUG")
CHANGED_FILES = os.getenv("CHANGED_FILES")

print(f'\033[36mFiles to analyze: {CHANGED_FILES}\033[0m')
CHANGED_FILES = ast.literal_eval(CHANGED_FILES)
for file_path in CHANGED_FILES:
    print(f'\n\033[36mFile Path: {file_path}\033[0m')
    # Open the file and read its content
    with open(file_path, 'r') as file:
        file_content = file.read()

    # Execute the steps
    access_token = get_access_token(ACCOUNT_SLUG, CLIENT_ID, CLIENT_KEY)
    execution_id = create_rqc_execution(QC_SLUG, access_token, file_content)
    execution_status = get_execution_status(execution_id, access_token)
    result = execution_status['result']
    # Remove the leading and trailing ```json and ``` for correct JSON parsing
    if result.startswith("```json"):
        result = result[7:-4].strip()

    result_data = json.loads(result)

    vulnerabilities_amount = len(result_data)

    print(f"\n\033[36m{vulnerabilities_amount} item(s) have been found for file {file_path}:\033[0m")

    # Iterate through each item and print the required fields
    for item in result_data:
        print(f"\nTitle: {item['title']}")
        print(f"Severity: {item['severity']}")
        print(f"Correction: {item['correction']}")
        print(f"Lines: {item['lines']}")
The last section of the code basically extracts the data we want from the result JSON object, according to what has been configured during the Prompt configuration step, to display the data during the action execution.
Workflow example
To call this action, we now need a workflow file that would trigger on (for example) a pull_request event. Here is an example of such a workflow:
name: Action Test

on:
  pull_request:

jobs:
  security:
    runs-on: ubuntu-latest
    steps:
      - uses: <owner>/<repository>@main
        with:
          CLIENT_ID: ${{ secrets.CLIENT_ID }}
          CLIENT_KEY: ${{ secrets.CLIENT_KEY }}
          CLIENT_REALM: ${{ secrets.CLIENT_REALM }}
          QC_SLUG: sast-rqc # here is the remote Quick Command slug example
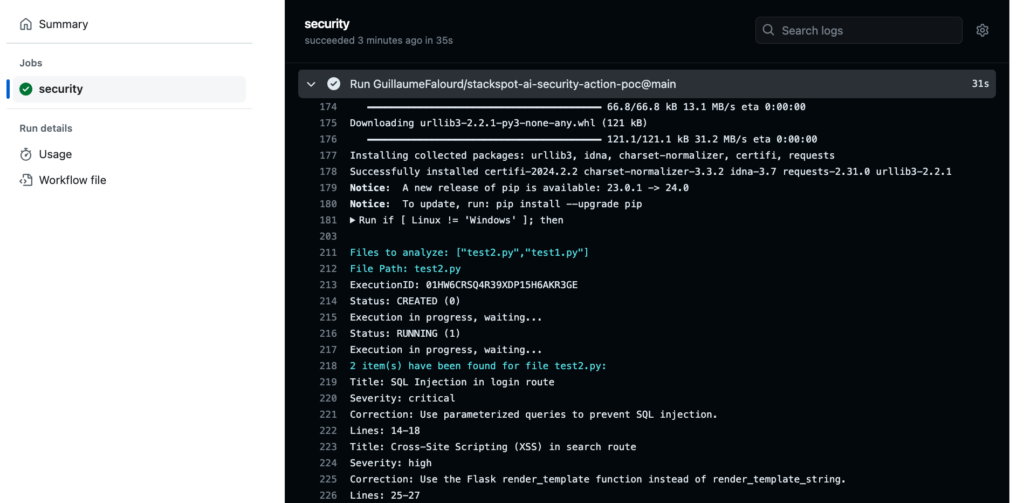
When triggering this pipeline, the workflow will run and call our script in Python. We should return something like the image below for each file updated in the PR:

Next steps
Now that the action is working as expected, we could add more features to improve the action based on the result.
Here are some ideas:
- Adding Knowledge Sources for the Quick Command to use when checking vulnerabilities (to keep it updated with the latest security data).
- Generate a report of the repo vulnerabilities, segregated by file.
- Comment on the PR in which vulnerabilities have been detected.
- Open a PR automatically using AI, correcting the vulnerabilities detected.
- Run the action checking all repo files occasionally to see if new vulnerabilities have been discovered.
- Add more vulnerability checks (SAST, DAST etc.)
Conclusion
We’ve been through the journey of creating a customizable GitHub Action using the StackSpot AI remote Quick Command concept, from prompt registry to GitHub Action implementation. We even used it in our CI/CD pipeline so that our team could get feedback as soon as they open a Pull Request on our repositories, having the shortest feedback loop possible online.
Note that it would be possible to perform the same operation locally, before committing the code using a StackSpot Action concept through the STK CLI. Who knows, we might do it in another article!
We hope this gives you some ideas and that you’ll create your own action using StackSpot AI in the future. If you do that, please share it on our social media!
The repository used as proof-of-concept for this article can be found here.

 Skip to content


