
 Skip to content
Artificial intelligence (AI) has transformed the design and execution of automated Rest API testing. By applying Machine Learning (ML) and natural language processing techniques, AI can analyze vast data sets and API specifications to generate comprehensive and relevant test cases automatically. This speeds up the testing process and increases its effectiveness by identifying unexplored quality areas.
In this article, you’ll learn how to use StackSpot AI’s contextualized code assistant to create automated Rest API testing, simplifying the development and coding of automation projects.
Getting to know StackSpot AI
StackSpot is a development platform that empowers engineering teams to modernize legacy systems and deliver value faster by centralizing and reusing technology standards, generating highly contextualized code through AI, and optimizing the cloud journey. It is divided into three offerings: StackSpot EDP and StackSpot AI (the latter is the focus of this article).
StackSpot AI can use your context, Knowledge Sources, and tech decisions to generate more assertive, high-quality suggestions. Moreover, the AI assistant enables the creation of quick commands to automate repetitive tasks. Say goodbye to generic suggestions and adopt hyper-contextualized code generation!
The best part: StackSpot AI has a freemium plan. Use the web version or download the IDE extensions (IntelliJ or Visual Code) to get started!
Automated Rest API testing: first steps with StackSpot AI
In this article, we’ll create a Rest API test automation project using Java, Restassured, Cucumber, and Maven.
We’ll use a personal account (GitHub) to access the StackSpot AI portal, download the AI contextualized code assistant Plugin, and add the development tool (IntelliJ).
The AI contextualized code wizard will help generate the initial project code based on the questions and context, suggesting code to add to the project.
Finally, we’ll add new test scenarios and refactor the code, making our project more comprehensive and reusable for the software community.
So, let’s get started:
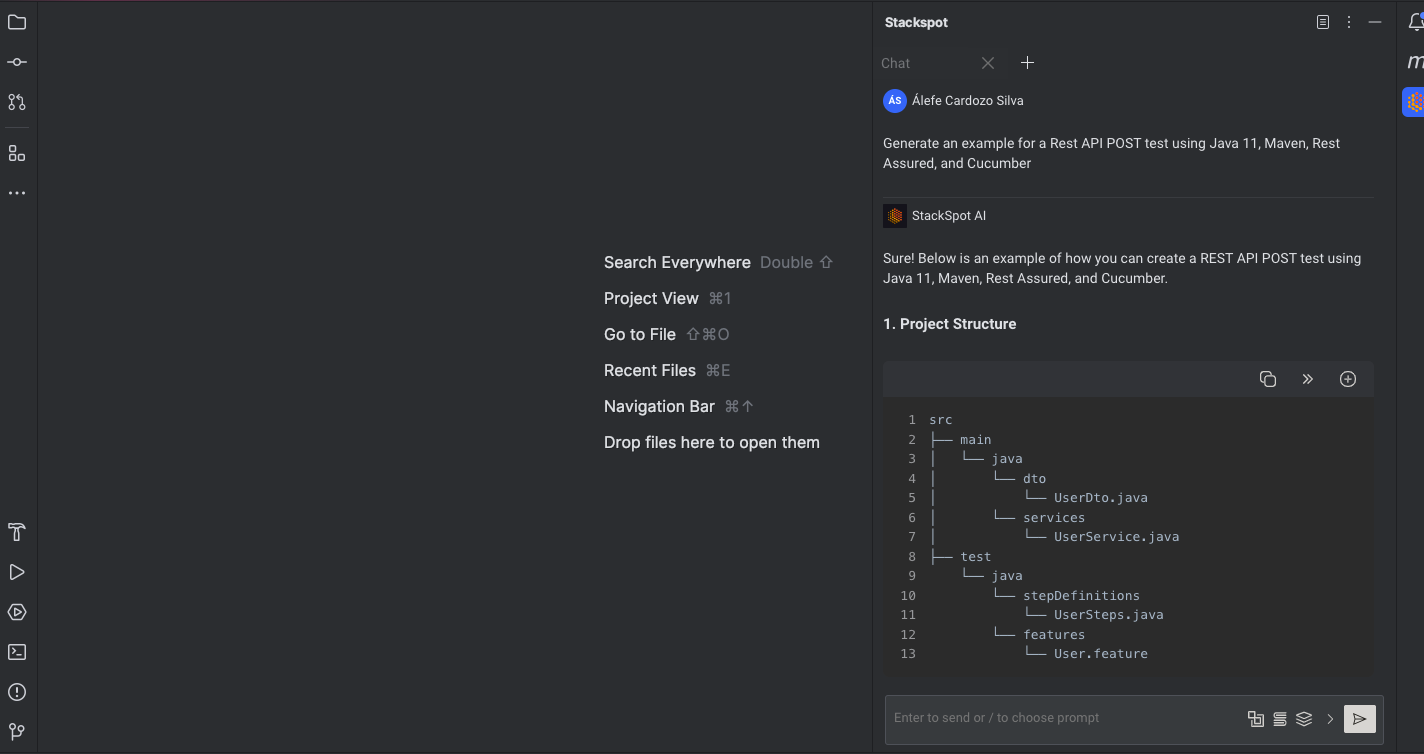
Log in to the StackSpot AI Login page. An account created on GitHub is necessary for this step.
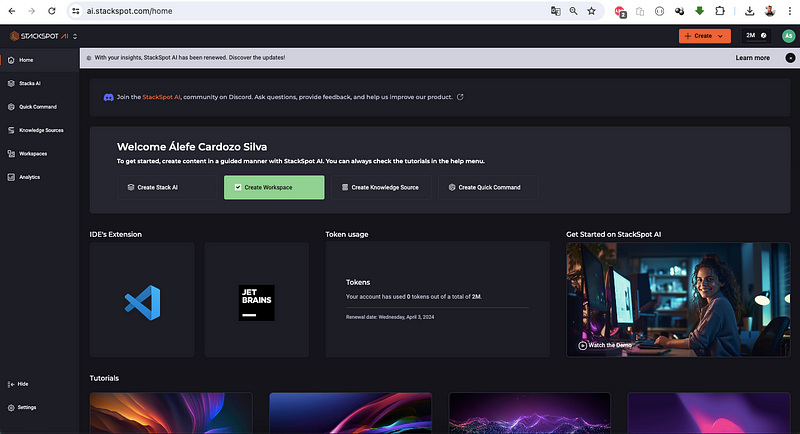
You will see this initial screen within the StackSpot AI environment:
Defining the installation
For the installation, follow the recommended guidelines for building the test automation:
IDE
IDE Plugin
Language
Dependencies
Maven libraries
- Restassured (version 4.3.3)
- Cucumber-Java (version 6.10.4)
- Cucumber-JUnit (version 6.10.4)
- JUnit (version 4.13.2)
- JavaFaker (version 1.02)
Creating the automated Rest APIs testing project
To create and run the Rest API test automation project, follow the guidelines.
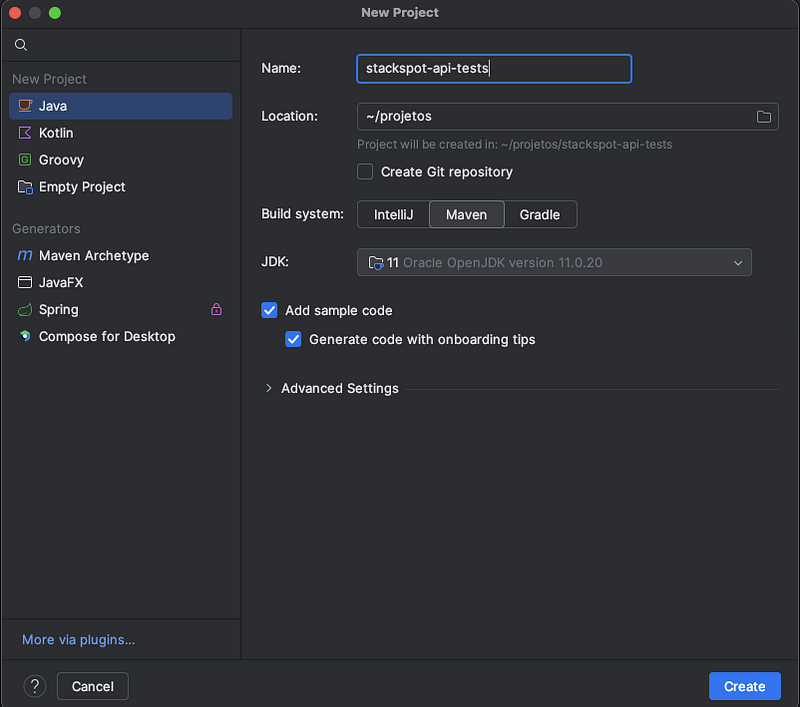
1 – Creating a new project for automated Rest API tests
After completing the installations (previous step), simply:
- Access IntelliJ IDE.
- Go to the File menu and choose “New -> Project”.
- Click on New Project and the “Java” option.
- Fill in the Name field with the name of the project.
- Click on Build System and choose “Maven”.
That’s it! The Rest API test automation project has been created.
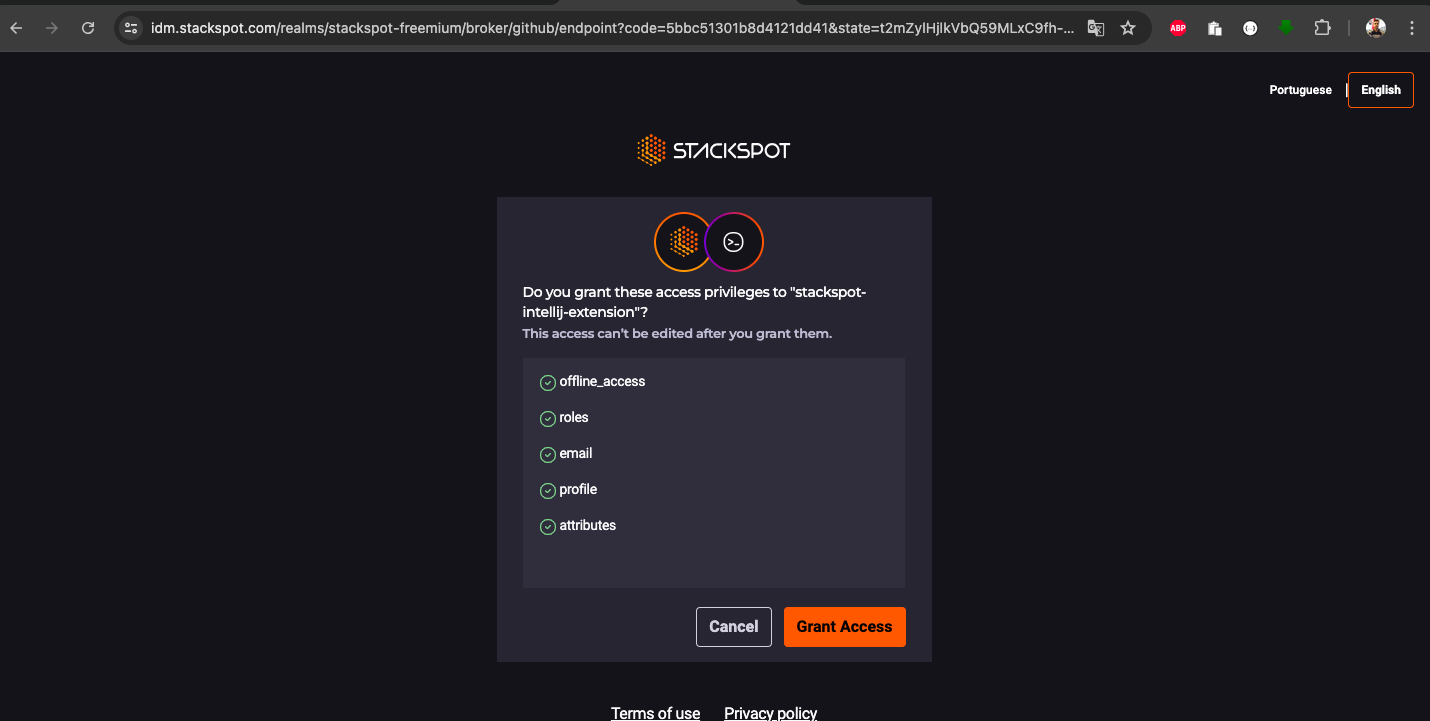
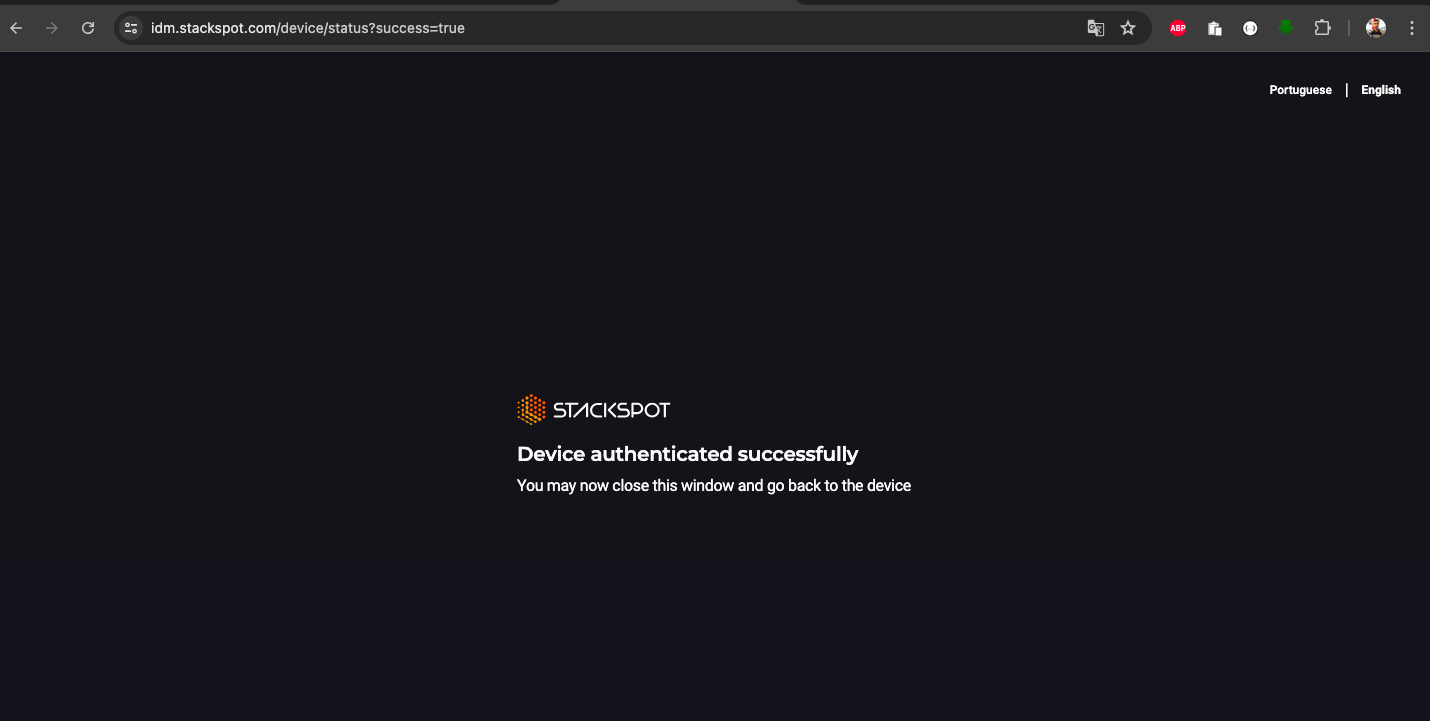
2 – Authenticating with StackSpot AI
With the IntelliJ IDE already open and the project already created (previous step), simply:
- Access the StackSpot AI plugin.
- Fill in the email field of your GitHub account.
- Click on the “Continue with GitHub” button.
- Click the “Yes” button on the screen that opens. After receiving confirmation, return to IntelliJ.
That’s it! After authentication, you can use StackSpot AI.

3 – Generating code
With the project already created in the IntelliJ IDE and logged in to StackSpot AI (previous step), simply:
- Access the StackSpot AI Plugin.
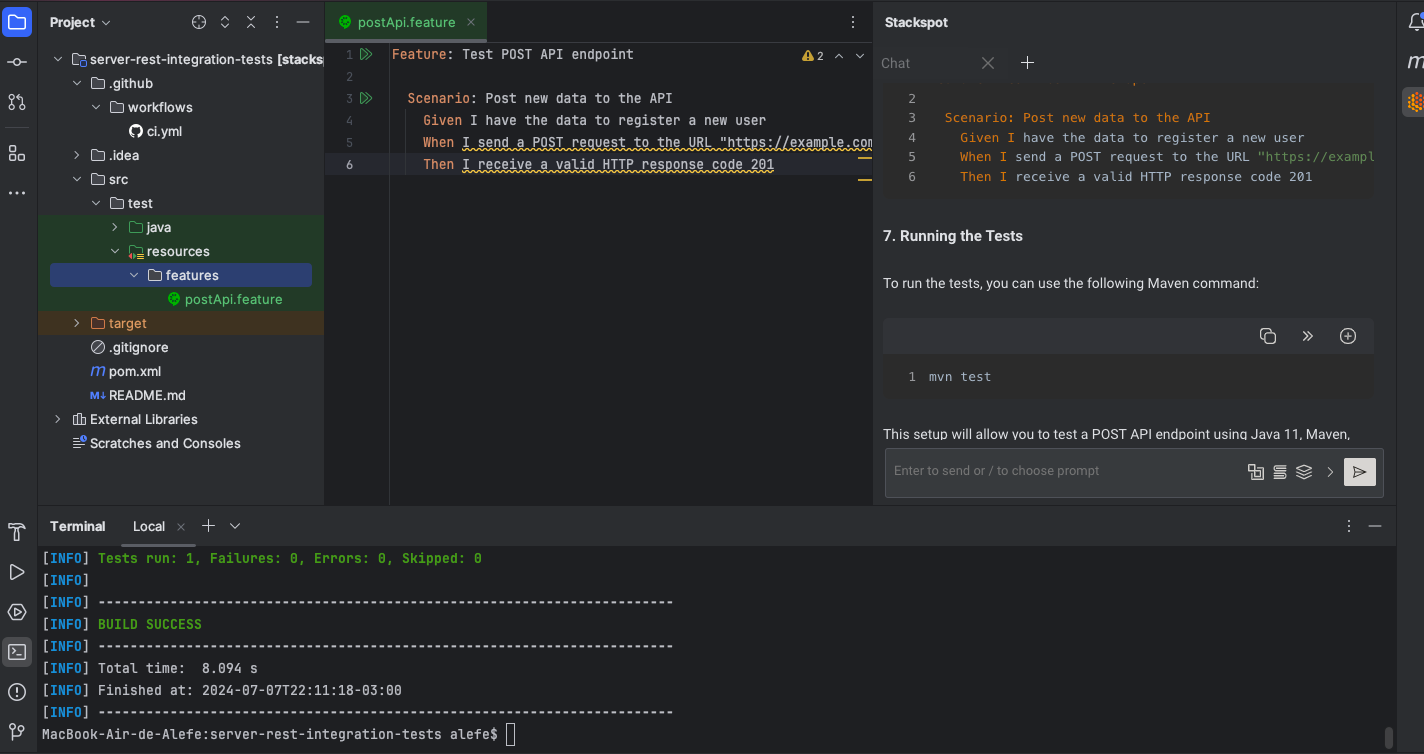
- Ask the AI questions: Generate an example for a Rest API POST test using Java 11, Maven, Rest Assured, and Cucumber. In this article, learn how to create a good prompt in StackSpot AI.
- Copy the created code and create suggested folders/files for the project.
That’s it! The code has been generated, and we can add it to the project created for use.
Adding the code generated by StackSpot AI to the project
Let’s add the generated code to the project for automated Rest API testing, following the steps below:
1. Configure the project with Maven
In your project’s pom.xml file, add the following dependencies for Cucumber, JUnit, and RestAssured.
pom.xml

<dependencies>

       <!-- RestAssured -->

       <dependency>

           <groupId>io.rest-assured</groupId>

           <artifactId>rest-assured</artifactId>

           <version>4.3.3</version>

           <scope>test</scope>

       </dependency>

       <!-- Cucumber -->

       <dependency>

           <groupId>io.cucumber</groupId>

           <artifactId>cucumber-java</artifactId>

           <version>6.10.4</version>

           <scope>test</scope>

       </dependency>

       <dependency>

           <groupId>io.cucumber</groupId>

           <artifactId>cucumber-junit</artifactId>

           <version>6.10.4</version>

           <scope>test</scope>

       </dependency>

       <!-- JUnit -->

       <dependency>

           <groupId>junit</groupId>

           <artifactId>junit</artifactId>

           <version>4.13.2</version>

           <scope>test</scope>

       </dependency>

   </dependencies>
2. Create the test scenario with Cucumber
Create a feature file for Cucumber.
src/test/resources/features/postFeature.feature

Feature: Test POST API endpoint

 Scenario: Post new data to the API

   Given I set POST API endpoint

   When I send POST HTTP request

   Then I receive valid HTTP response code 201
3. Implement the test with RestAssured
Now, implement the test steps using RestAssured. Create a test class corresponding to your Cucumber scenario.
src/test/java/stepDefinitions/PostApiSteps.java

package com.example.steps;

import io.cucumber.java.en.Given;

import io.cucumber.java.en.When;

import io.cucumber.java.en.Then;

import io.restassured.RestAssured;

import io.restassured.response.Response;

import static org.junit.Assert.*;

public class PostApiSteps {

   private Response response;

   @Given("I set POST API endpoint")

   public void i_set_post_api_endpoint() {

       RestAssured.baseURI = "http://yourapi.com/api";

   }

   @When("I send POST HTTP request")

   public void i_send_post_http_request() {

       response = RestAssured.given().contentType("application/json")

               .body("{\"key\": \"value\"}")

               .when().post("/endpoint");

   }

   @Then("I receive valid HTTP response code 201")

   public void i_receive_valid_http_response_code_201() {

       assertEquals(201, response.getStatusCode());

   }

}
4. Setting up Runner with Cucumber
Create a class to run the Cucumber tests.
src/test/java/cucumberOptions/TestRunner.java

package com.example;

import io.cucumber.junit.Cucumber;

import io.cucumber.junit.CucumberOptions;

import org.junit.runner.RunWith;

@RunWith(Cucumber.class)

@CucumberOptions(

       features = "src/test/resources/features",

       glue = "com.example.steps",

       plugin = {"pretty", "html:target/cucumber-reports.html"},

       monochrome = true

)

public class TestRunner {

}
Running automated Rest API tests
To run automated Rest API tests, you can use the Maven command.
mvn test
At this point, you have an example of the code and structure of the integrated Rest API test automation project, making a POST request, receiving a response, and validating the status code. Now, adjust what has been generated according to your needs.
Next, we need to improve the code and organize the project, adding the GET request, receiving responses, and validating data.
To do this, use the ServeRest APIs to:
- Register a new user (POST User)
- Consult registered user (GET User)
- Consult unregistered user (GET User)
The adjustments will be demonstrated below, based on the scenarios to be validated.
Refactoring the project to make the implementation more straightforward and organized
To refactor, make the changes below:
1 – Adjusting the project with Maven
Adjust the pom.xml file to contain the implementations.
pom.xml

<?xml version="1.0" encoding="UTF-8"?>

<project xmlns="http://maven.apache.org/POM/4.0.0"

        xmlns:xsi="http://www.w3.org/2001/XMLSchema-instance"

        xsi:schemaLocation="http://maven.apache.org/POM/4.0.0 http://maven.apache.org/xsd/maven-4.0.0.xsd">

   <modelVersion>4.0.0</modelVersion>

   <groupId>org.example</groupId>

   <artifactId>StackSpot-api-integration-tests</artifactId>

   <version>1.0-SNAPSHOT</version>

   <properties>

       <maven.compiler.source>11</maven.compiler.source>

       <maven.compiler.target>11</maven.compiler.target>

       <project.build.sourceEncoding>UTF-8</project.build.sourceEncoding>

   </properties>

   <dependencies>

       <!-- RestAssured -->

       <dependency>

           <groupId>io.rest-assured</groupId>

           <artifactId>rest-assured</artifactId>

           <version>4.3.3</version>

           <scope>test</scope>

       </dependency>

       <!-- Cucumber -->

       <dependency>

           <groupId>io.cucumber</groupId>

           <artifactId>cucumber-java</artifactId>

           <version>6.10.4</version>

           <scope>test</scope>

       </dependency>

       <dependency>

           <groupId>io.cucumber</groupId>

           <artifactId>cucumber-junit</artifactId>

           <version>6.10.4</version>

           <scope>test</scope>

       </dependency>

       <!-- JUnit -->

       <dependency>

           <groupId>junit</groupId>

           <artifactId>junit</artifactId>

           <version>4.13.2</version>

           <scope>test</scope>

       </dependency>

       <!-- Java Faker -->

       <dependency>

           <groupId>com.GitHub.javafaker</groupId>

           <artifactId>javafaker</artifactId>

           <version>1.0.2</version>

       </dependency>

   </dependencies>

</project>
2 – Adjusting the test scenario with Cucumber
Adjust the resources/features/user.feature file to contain the implementations.
src/test/resources/features/user.feature

Feature: User API

  @all @user-register

  Scenario: Should register a new user

    Given I have the data to register a new user

    When I make a POST request to the URL "https://serverest.dev/usuarios"

    Then The response status code should be 201 to a new user

  @all @user-not-registered

  Scenario: Should query registered user

    Given I do not have a registered user but wish to register

    When I make a GET request to the URL "https://serverest.dev/usuarios"

    Then The response status code should be 200 to registered user

  @all @user-non-existent

  Scenario: Should query non-registered user

    Given I do not have a registered user "XPTO"

    When I make a GET request to the URL "https://serverest.dev/usuarios"

    Then The response status code should be 400 to non-registered user
3 – Adjusting the test steps with RestAssured
Adjust the file stepDefinitions/UserSteps.java to contain the implementation of the feature’s tests for registering a new user, consulting a registered user, and consulting an unregistered user.
src/test/java/stepDefinitions/UserSteps.java

package stepDefinitions;

import io.cucumber.java.en.Given;

import io.cucumber.java.en.Then;

import io.cucumber.java.en.When;

import io.restassured.response.Response;

import services.UserService;

public class UserSteps {

    private Response response;

    private String body;

    private String idUser;

    private final UserService userService = new UserService();

    @Given("I have the data to register a new user")

    public void i_have_the_data_to_register_a_new_user() {

        body = userService.generateUserData();

    }

    @When("I make a POST request to the URL {string}")

    public void i_make_a_post_request_to_the_url(String url) {

        response = userService.createNewUser(url, body);

    }

    @Then("The response status code should be {int} to a new user")

    public void the_response_status_code_should_be_to_a_new_user(int statusCode) {

        idUser = userService.validateRegisteredUserData(response, statusCode);

    }

    @Given("I do not have a registered user but wish to register")

    public void i_do_not_have_a_registered_user_but_wish_to_register() {

        idUser = userService.checkExistingUser(null);

    }

    @When("I make a GET request to the URL {string}")

    public void i_make_a_get_request_to_the_url(String url) {

        response = userService.queryUser(url, idUser);

    }

    @Then("The response status code should be {int} to registered user")

    public void the_response_status_code_should_be_to_registered_user(int statusCode) {

        userService.validateQueriedUserData(response, idUser, statusCode);

    }

    @Given("I do not have a registered user {string}")

    public void i_do_not_have_a_registered_user(String newUserId) {

        idUser = newUserId;

    }

    @When("I make an attempt to GET request to the URL {string}")

    public void i_make_an_attempt_to_get_request_to_the_url(String url) {

        response = userService.queryUser(url, idUser);

    }

    @Then("The response status code should be {int} to non-registered user")

    public void the_response_status_code_should_be_to_non_registered_user(int statusCode) {

        userService.validateNonRegisteredUserData(response, statusCode);

    }

}
4 – Creating the DTO structure to manipulate the request data
Create the file dto/UserDto to create get/set and access to the object/class attributes.
src/test/java/dto/UserDto.java

package dto;

public class UserDto {

    private String name;

    private String email;

    private String password;

    private String admin;

    // Getter and Setter for name

    public String getName() {

        return name;

    }

    public void setName(String name) {

        this.name = name;

    }

    // Getter and Setter for email

    public String getEmail() {

        return email;

    }

    public void setEmail(String email) {

        this.email = email;

    }

    // Getter and Setter for password

    public String getPassword() {

        return password;

    }

    public void setPassword(String password) {

        this.password = password;

    }

    // Getter and Setter for admin

    public String getAdmin() {

        return admin;

    }

    public void setAdmin(String admin) {

        this.admin = admin;

    }

}
5 – Creating the Service structure to set up the request
Create the file service/UserService.java to set up the requests to be made.
src/test/java/service/UserService.java

package services;

import com.github.javafaker.Faker;

import dto.UserDto;

import io.restassured.path.json.JsonPath;

import io.restassured.response.Response;

import static io.restassured.RestAssured.given;

import static org.junit.Assert.assertEquals;

public class UserService {

    private Response response;

    private String requestBody;

    private String userId;

    private UserDto userDto;

    private Faker faker;

    private String newUserId;

    public String generateUserData(){

        faker = new Faker();

        userDto = new UserDto();

        userDto.setName(faker.name().name());

        userDto.setEmail(faker.internet().emailAddress());

        userDto.setPassword("123456");

        userDto.setAdmin("true");

        requestBody = "{\n" +

                "  \"nome\": \""+userDto.getName()+"\",\n" +

                "  \"email\": \""+userDto.getEmail()+"\",\n" +

                "  \"password\": \""+ userDto.getPassword()+"\",\n" +

                "  \"administrador\": \""+ userDto.getAdmin()+"\"\n" +

                "}";

        return requestBody;

    }

    public Response createNewUser(String url, String requestBody){

        response = given()

                .header("Content-type", "application/json")

                .and()

                .log().all()

                .body(requestBody)

                .when()

                .post(url)

                .then()

                .log().all()

                .extract().response();

        return response;

    }

    public String validateRegisteredUserData(Response response, int statusCode){

        JsonPath jsonPathEvaluator = response.jsonPath();

        assertEquals(statusCode, response.getStatusCode());

        userId = jsonPathEvaluator.get("_id");

        return userId;

    }

    public String checkExistingUser(String userId){

        String newBody;

        Response newResponse;

        if (userId == null){

            newBody = generateUserData();

            newResponse = createNewUser("https://serverest.dev/usuarios",newBody);

            newUserId = validateRegisteredUserData(newResponse, 201);

        }

        else{

            newUserId = userId;

        }

        return newUserId;

    }

    public Response queryUser(String url, String newUserId){

        response = given()

                .header("Content-type", "application/json")

                .and()

                .log().all()

                .when()

                .get(url + "/" + newUserId)

                .then()

                .log().all()

                .extract().response();

        return response;

    }

    public void validateQueriedUserData(Response response, String newId, int statusCode){

        JsonPath jsonPathEvaluator = response.jsonPath();

        if (newUserId.equals(newId)) {

            assertEquals(statusCode, response.getStatusCode());

            assertEquals(newUserId, jsonPathEvaluator.get("_id"));

        }

        else {

            assertEquals(userDto.getName(), jsonPathEvaluator.get("name"));

            assertEquals(userDto.getEmail(), jsonPathEvaluator.get("email"));

            assertEquals(userDto.getPassword(), jsonPathEvaluator.get("password"));

            assertEquals(userDto.getAdmin(), jsonPathEvaluator.get("admin"));

            assertEquals(statusCode, response.getStatusCode());

            assertEquals(userId, jsonPathEvaluator.get("_id"));

        }

    }

    public void validateNonRegisteredUserData(Response response, int statusCode){

        assertEquals(statusCode, response.getStatusCode());

    }

}
Running the tests after refactoring
To run the tests, you can use the Maven command.
mvn test
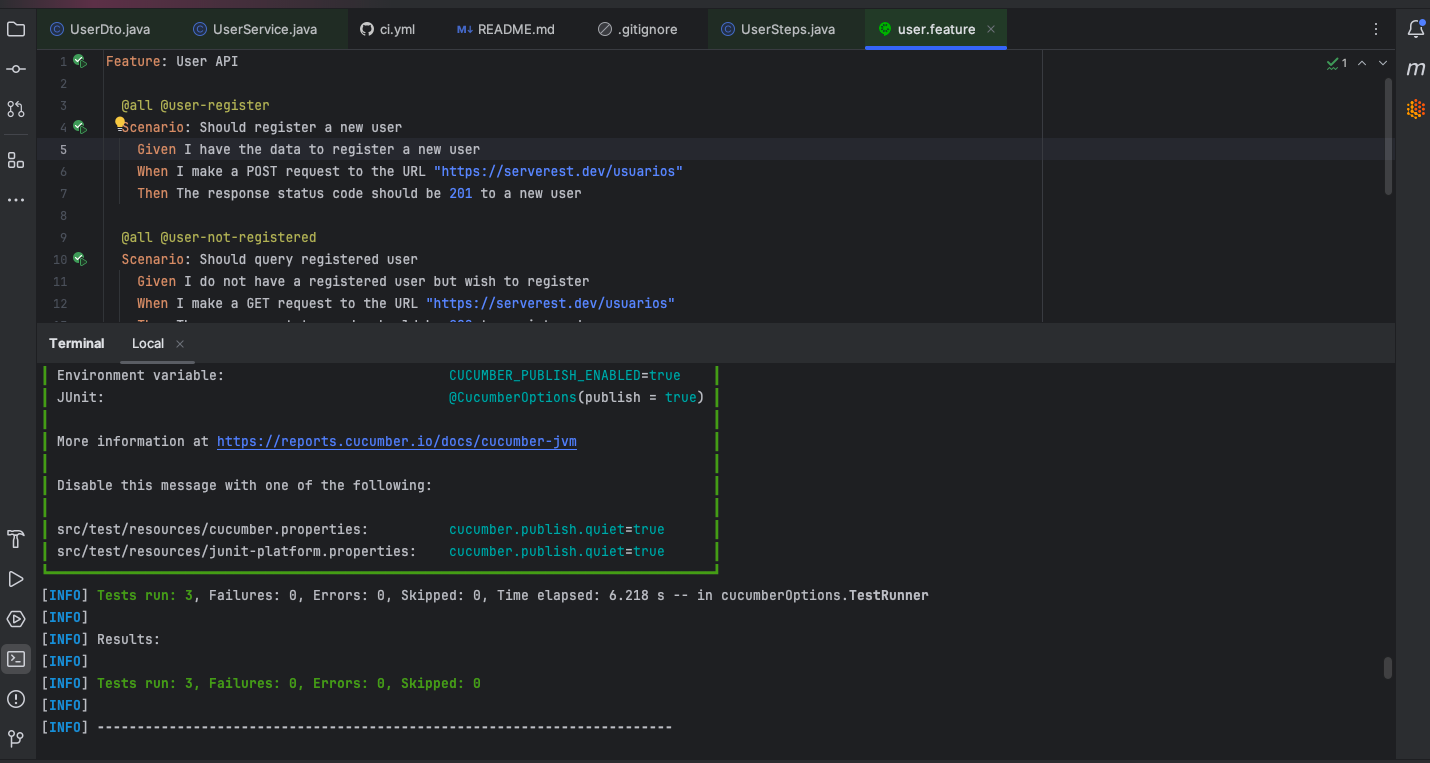
That’s it! The adjusted project has been successfully executed. With the help of StackSpot AI, scenarios were written more effectively, code reuse was promoted, and automated Rest API tests were simplified.
Watch the video tutorial on YouTube:
Conclusion
This article shows the advantages of embracing a contextualized artificial intelligence tool like StackSpot AI in automated Rest API testing processes. By integrating the right AI tool, the entire software development cycle has gained speed and efficiency. Software Quality processes also reaped major benefits from the new features in this scenario.
Using StackSpot AI, it has been possible to adopt assertive suggestions based on their own standards and sources of knowledge. This brings unprecedented efficiency, reliability, and innovation to their automated Rest API testing and QA processes.
Do you have any questions or suggestions? Please leave us a comment!