


In this article, you’ll learn how to make Mermaid Diagrams using Quick Commands, a feature of StackSpot AI. You’ll gain access to a more integrated and efficient solution through automation and Quick Commands. Follow the tutorial below.
StackSpot AI Extension
The StackSpot AI Extension is a generative, hyper-contextualized development assistant that provides an extension for IDEs, designed to enhance code quality, streamline workflows and significantly boost efficiency.
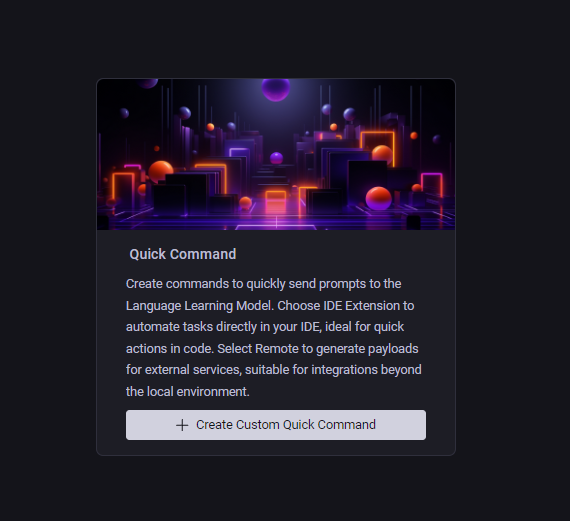
What are Quick Commands?
StackSpot’s Quick Commands are IDE shortcuts that automatically apply predefined prompts to code snippets.
You can configure these prompts on an online platform through prompt engineering and integrate the command results with online APIs, simplifying repetitive and complex tasks while saving time and effort.
The Plugin integrates seamlessly with the IntelliJ, PyCharm, and VSCode IDEs. Importantly, there is no significant difference between the Plugins for these IDEs, allowing you to take full advantage of all Quick Commands features in the same way, regardless of which IDE you are using. This ensures a consistent and convenient experience.
What are Mermaid Diagrams?
It’s a way of creating flowcharts in Markdown format, making your documentation and readme.md more engaging and informative for readers. You can learn more about Mermaid Diagrams on the official website.
Quick Command and Mermaid Diagram Tutorial
Step 1
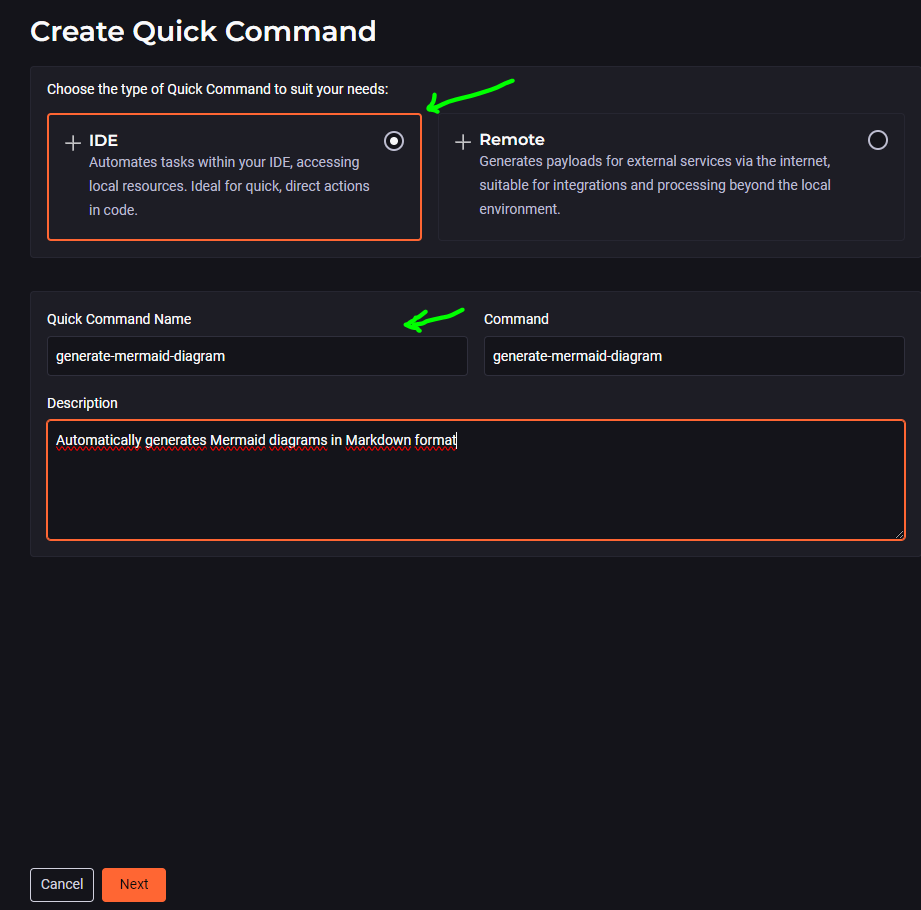
To begin, create a new Quick Command with a predefined prompt that reads the selected code and automates the construction of the flow diagram into a Markdown output.
Start by visiting the StackSpot AI website. Next, in the Quick Commands section, create the new Quick Command:
Select the IDE option to integrate this Quick Command with our Intellij. Fill in the essential information in the description field.
Step 2
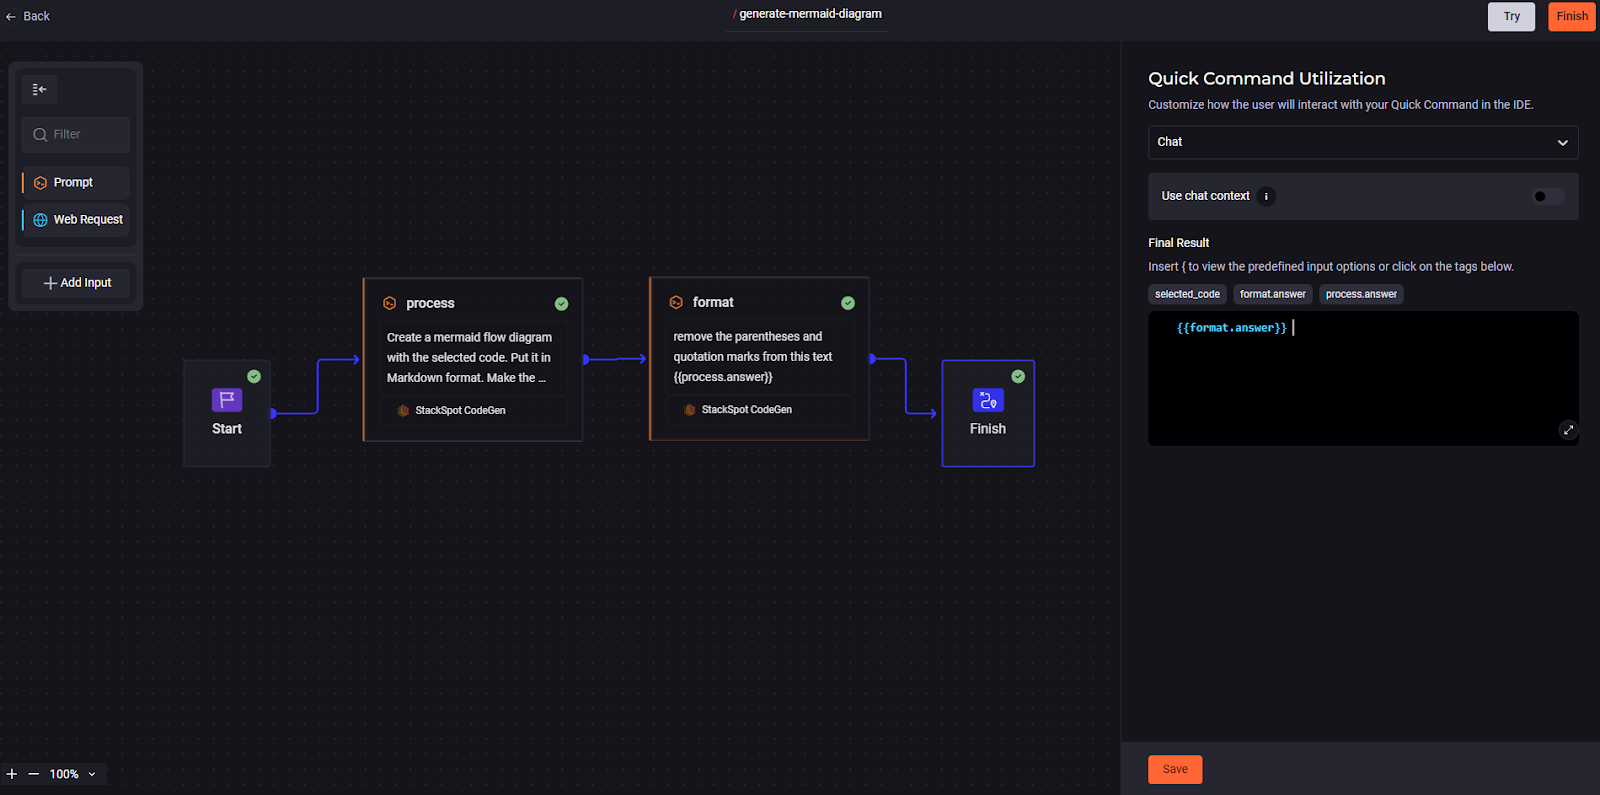
In the next step, you can either start from a blank template or use a preconfigured generic “Hello World” template. Let’s choose the latter option, and you ‘ll see the panel organized as a flow editor.
Flow editors enable users to create logic or processes by connecting blocks or visual components that represent an action or event. Blocks are dragged onto the panel and connected, forming a flow that defines the desired behavior or sequence of operations.
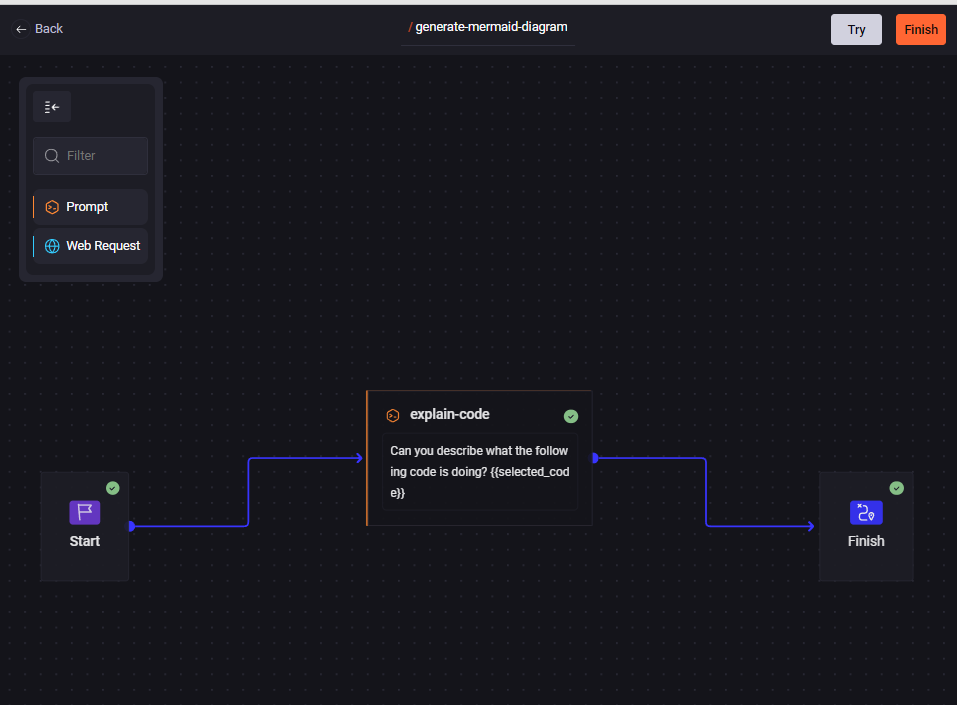
Step 4
The left-side menu features the two primary blocks we can work with: Prompt and Web Request.
- The prompt option allows us to work with prompt engineering, both to receive context for a prompt and to propagate its textual result to others.
- The web request option facilitates integration with external APIs, a powerful tool we‘ll explore in upcoming articles.
On this screen, we can also observe the elemental composition of a Quick Command: input (signaled by the Start block), processing (signaled by the central block that this is a prompt), and output (made up of the finished block).
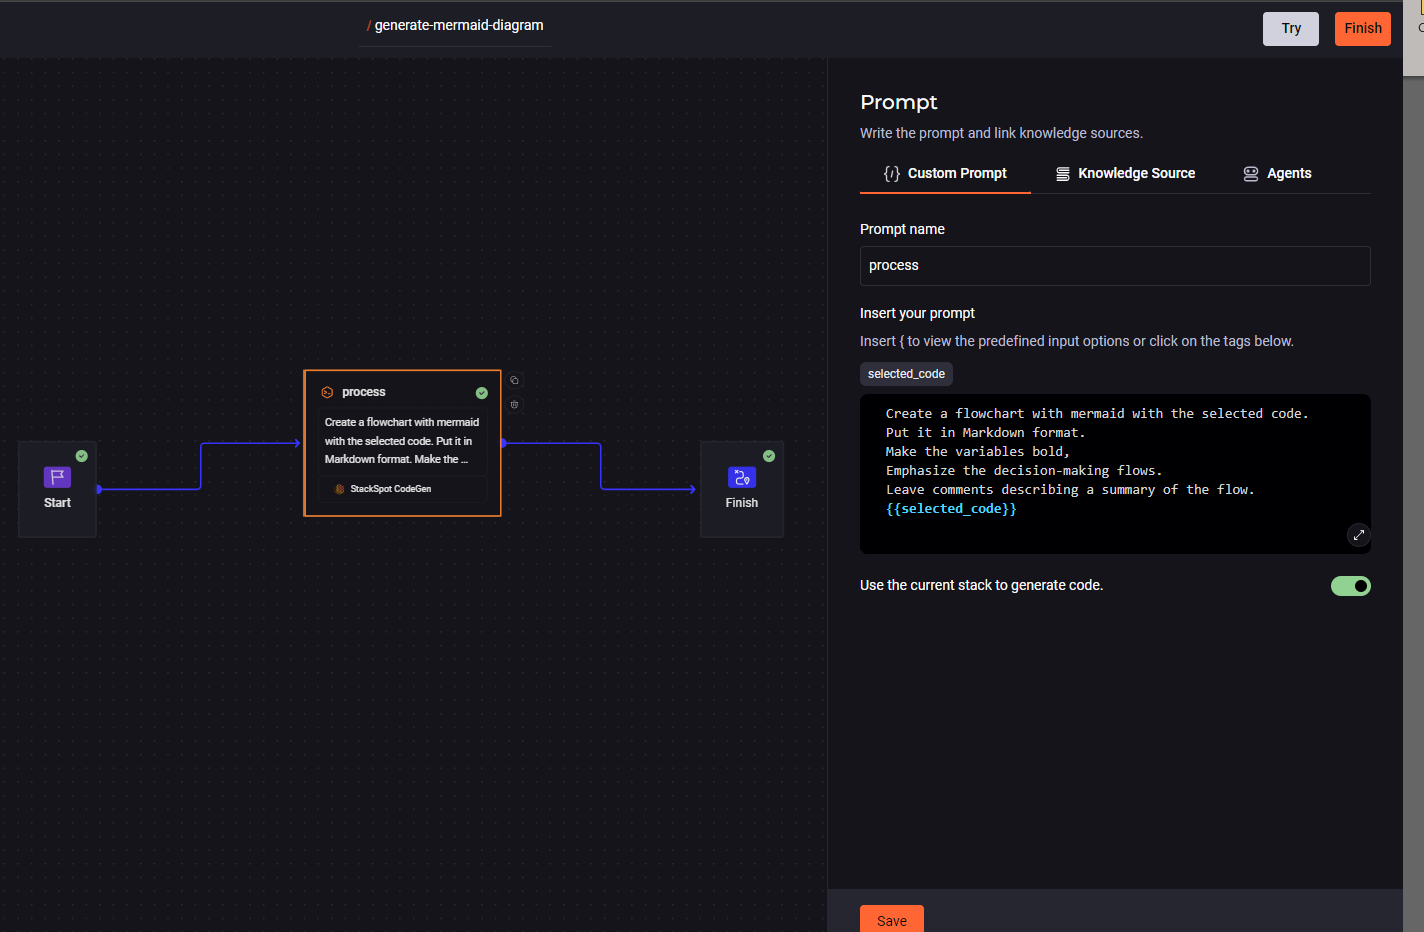
At this point, we can edit the central block to define the AI’s behavior based on the provided text. You can now apply prompt engineering to craft a text that instructs the AI on what you want in the most descriptive way possible. For example, consider the following prompt:
Create a flowchart in Mermaid using the selected code.
Put it in Markdown format.
Make the variables bold,
Emphasize the decision-making flows.
Leave comments describing a summary of the flow.
{{selected_code}}
Note that at the end, we have {{selected_code}}; this is how the command above applies to the code that will be selected in the IDE.
Step 5
Finally, let’s edit the final block, carefully selecting the response the processing block will send. In the panel, the answer takes the format { { block-name.answer}} .
Select the “chat” option in the first option box to specify how Quick Command will interact with the selected code. We can either insert the code generated by the AI directly into the analyzed code or send the answer in the chat. We’ll opt for the latter.
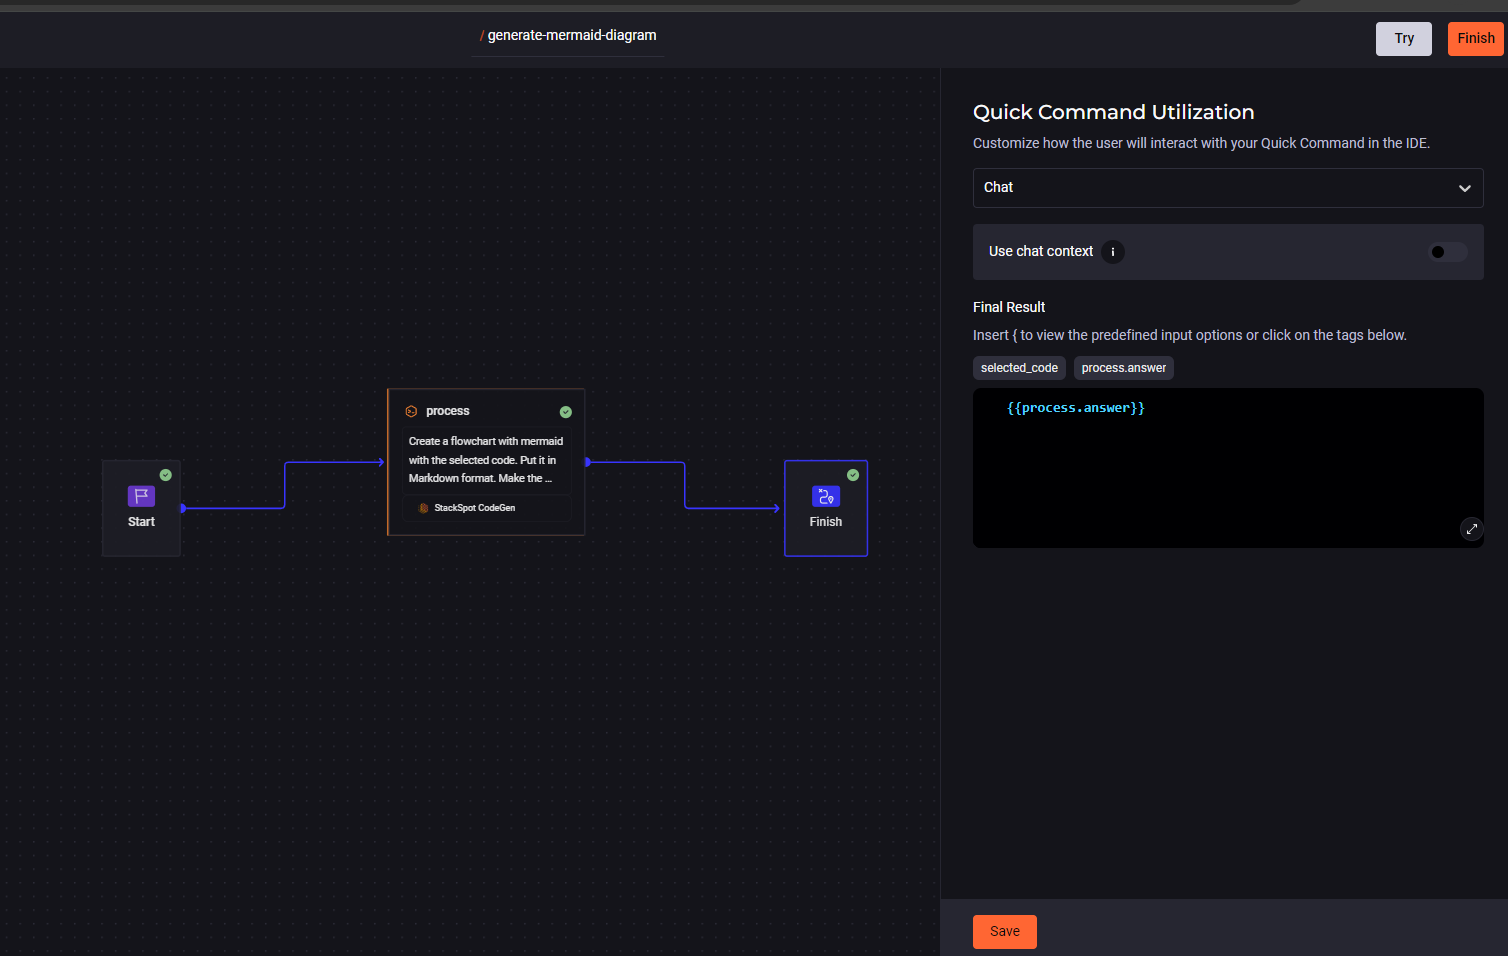
Once that is done, we can finish the Quick Command or test the result directly on our panel.
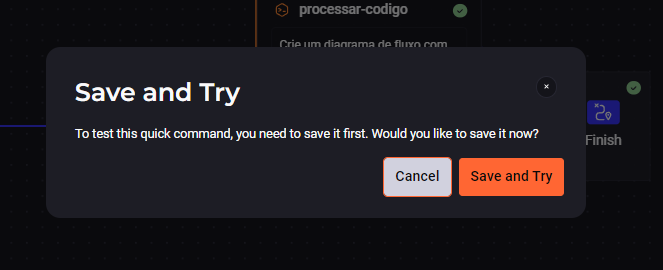
Step 6
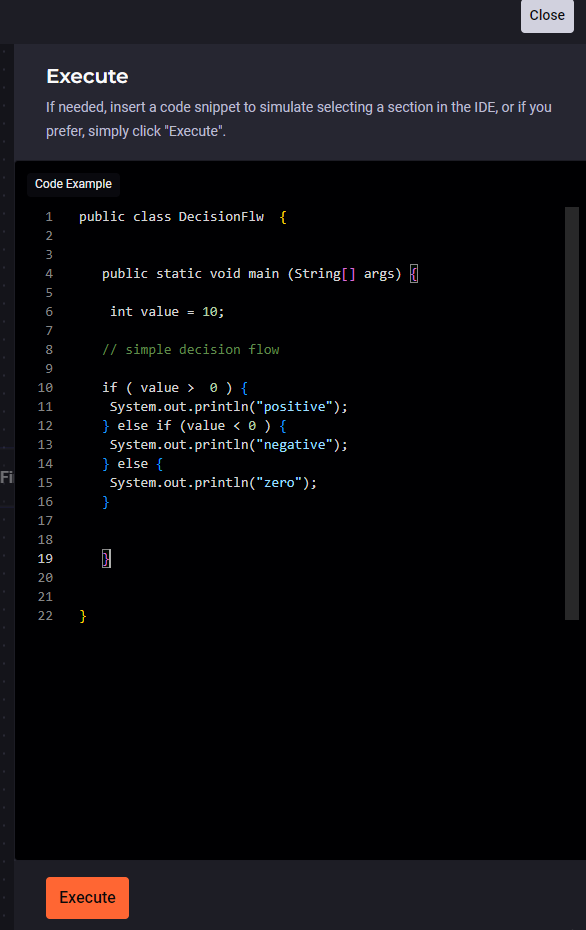
Now save and test the Quick Command you’ve just created. StackSpot AI offers a panel where you can paste any block of code (regardless of language) which will serve as input for the prompt.
For our first test, let’s use a generic Java code that contains a simple decision flow, helping us determine if the Mermaid Diagram matches our code:
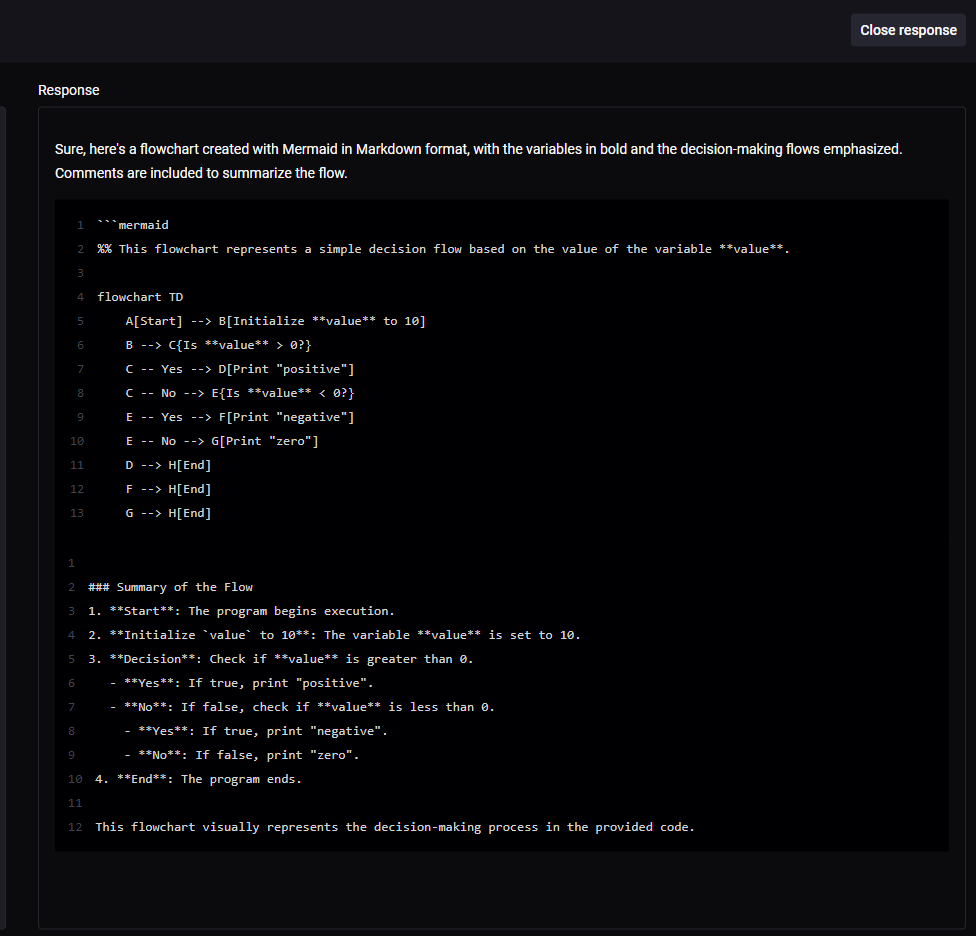
We can see the result by running the flow and clicking on the “Finish” block. And for the first test, check out the output:
Step 7
We must validate that the diagram accurately represents the behavior of our code. To accomplish this, we’ll utilize the Mermaid Live Editor available on the site.
Since the result has been formatted in Markdown, we only need the block following the “mermaid” key code, which tells Markdown to interpret the following text as a diagram. This will be:
flowchart TD
A[Start] –> B[Initialize **value** to 10]
B –> C{Is **value** > 0?}
C — Yes –> D[Print “positive”]
C — No –> E{Is **value** < 0?}
E — Yes –> F[Print “negative”]
E — No –> G[Print “zero”]
D –> H[End]
F –> H[End]
G –> H[End]
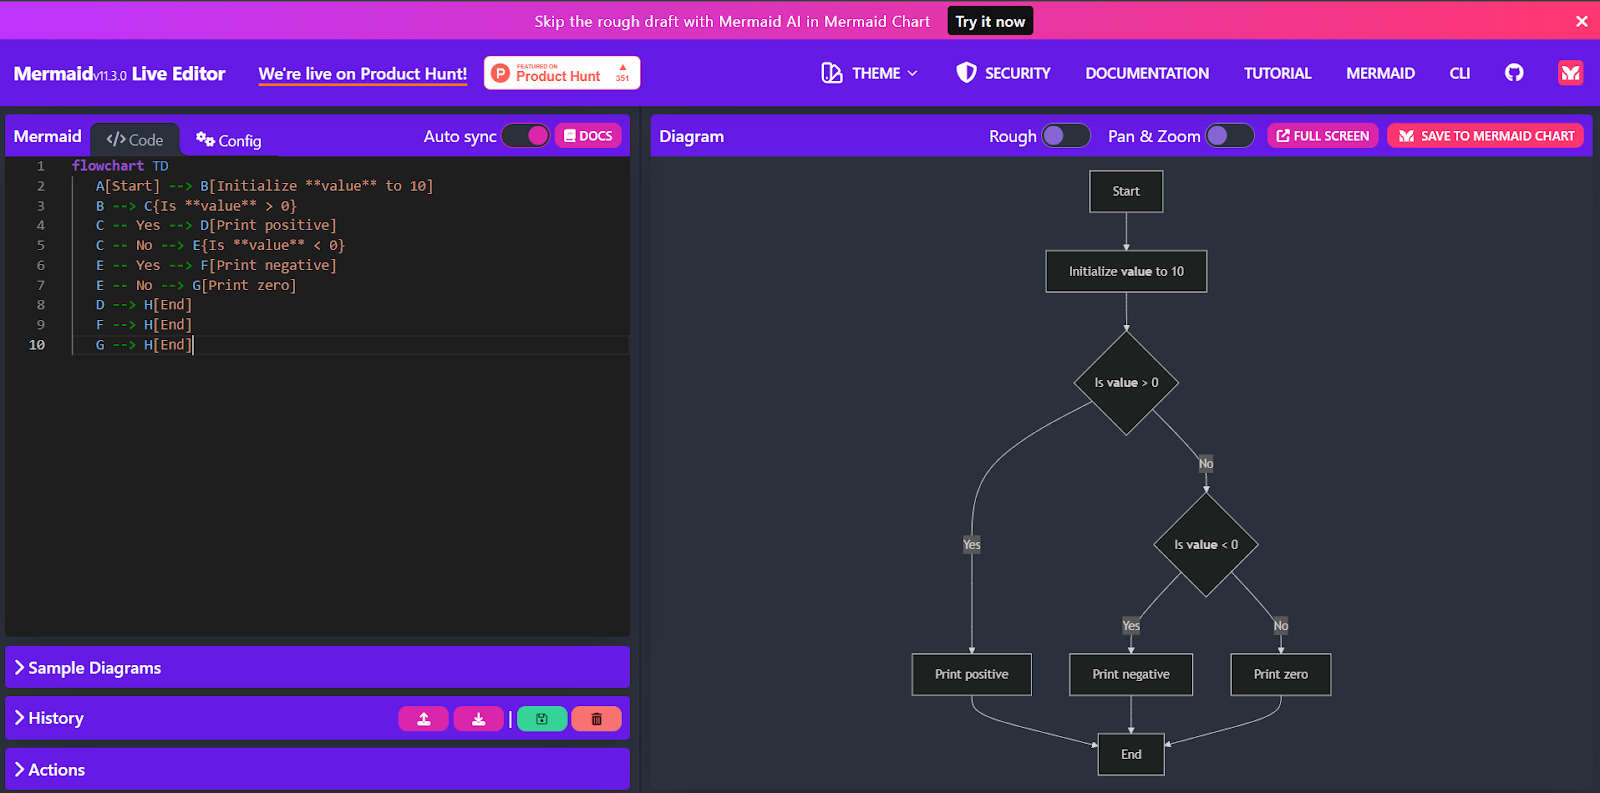
And if you paste this text into the Mermaid Live Editor, you’ll get the following result:
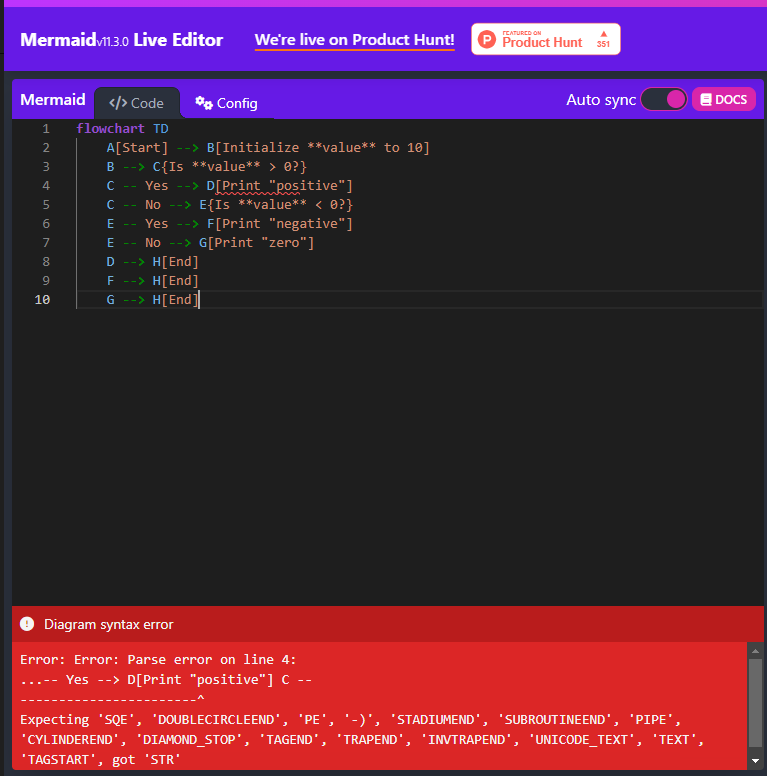
Something has gone wrong!
Handling errors and refining responses with Prompt Engineering
Nothing in this world is perfect, and the AI has added characters that are not allowed by Mermaid. To solve this, we need to refine our prompt engineering.
The platform allows you to link the prompt’s result to additional processing, creating a chain of processes that can lead to the desired outcome.
In this example, the first prompt did generate the diagram as expected; however, it inserted characters that are not recognized by Mermaid. Here’s how we can solve this problem: go back to the Quick Command panel and provide additional details to the AI to prevent the inclusion of these characters:
Create a mermaid flow diagram with the selected code.
Put it in Markdown format.
Make the variables bold,
Emphasize the decision-making flows.
Leave comments describing a summary of the flow.
– Attention! Do not use characters such as (){} [] in the descriptions, these characters are not allowed.
{{selected_code}}
And just to be sure, add another custom command to format the output correctly:
Testing again, we have a diagram with no errors:
Practical example in Java with the plugin for the IntelliJ IDE
With the configuration finalized, we can now test Quick Command directly in the IDE. In this example, a Java class has been created to simulate issuing and processing orders.
The entire code has been consolidated into a single class to make it easier to see and use Quick Command. At the end of the article, you’ll find links to the repository containing the complete code, including the generated diagrams.

And that was the result:
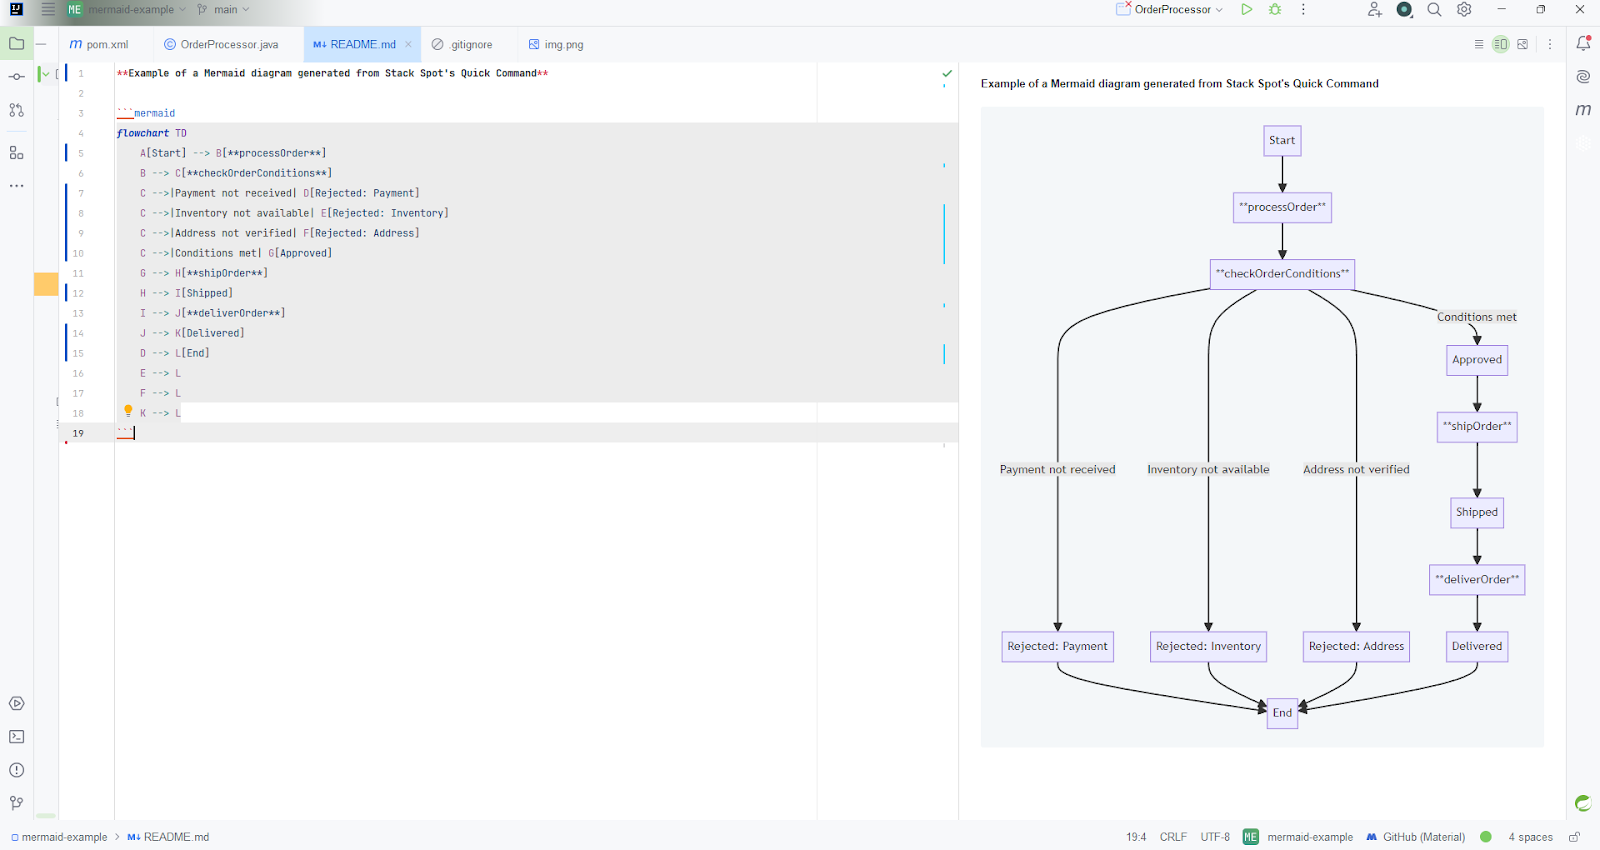
We use JetBrains’s Mermaid plugin to visualize the IDE’s Readme.
Conclusion
Before discovering StackSpot AI’s Quick Commands, I used to perform these tasks manually or through custom scripts. The difference when using the tool is striking: the automation and ease of configuration of Quick Commands far exceeds previous approaches, offering a more integrated and efficient solution.
In summary, StackSpot’s Quick Commands functionality marks a major advancement in automating development tasks in IDEs such as IntelliJ, PyCharm, and VSCode. By enabling the application of configurable prompts and integration with online APIs, this tool not only increases my productivity but also ensures accurate and consistent results.
If you haven’t yet tried StackSpot’s Quick Commands, I highly recommend doing so to experience how they can transform your programming.